一、实验内容
1.利用Thread和Handler实现异步操作;
2.利用AsyncTast实现异步操作;
1. 利用Thread和Handler实现异步操作
(1)新建一个安卓工程,在默认的layout主界面中添加一个按钮(Button),一个图片显示控件(ImageView)。
(2)将实验四资源中的所有图片导入到工程的drawable目录下。
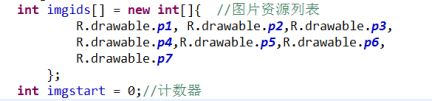
(3)参考下面的代码构建图片资源列表和计数器变量。
![]()
(4)为按钮添加点击事件,当点击按钮时,启动一个新线程(传入一个handler),并每隔100毫秒发送一条空信息,信息的what标识为0x123。
(5)定义一个handler用于接受线程的信息,并在handleMessage方法中处理信息,参考下列代码循环更新ImageView中的内容,实现动画效果。
![]()
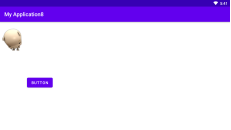
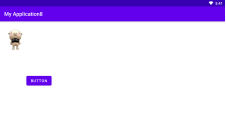
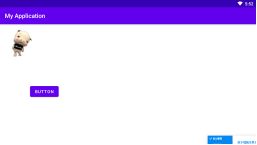
(6)测试上述功能。
![]()
![]()
1
2
3
4
5
6
7
8
9
10
11
12
13
14
15
16
17
18
19
20
21
22
23
24
25
26
27
28
| <?xml version="1.0" encoding="utf-8"?>
<androidx.constraintlayout.widget.ConstraintLayout xmlns:android="http://schemas.android.com/apk/res/android"
xmlns:app="http://schemas.android.com/apk/res-auto"
xmlns:tools="http://schemas.android.com/tools"
android:layout_width="match_parent"
android:layout_height="match_parent"
tools:context=".MainActivity">
<Button
android:id="@+id/button"
android:layout_width="wrap_content"
android:layout_height="wrap_content"
android:layout_marginStart="100dp"
android:layout_marginLeft="100dp"
android:layout_marginTop="200dp"
android:text="Button"
app:layout_constraintStart_toStartOf="parent"
app:layout_constraintTop_toTopOf="parent" />
<ImageView
android:id="@+id/imageView1"
android:layout_width="wrap_content"
android:layout_height="wrap_content"
android:scaleType="fitXY"
tools:ignore="MissingConstraints" />
</androidx.constraintlayout.widget.ConstraintLayout>
|
1
2
3
4
5
6
7
8
9
10
11
12
13
14
15
| <?xml version="1.0" encoding="utf-8"?>
<androidx.constraintlayout.widget.ConstraintLayout xmlns:android="http://schemas.android.com/apk/res/android"
xmlns:app="http://schemas.android.com/apk/res-auto"
xmlns:tools="http://schemas.android.com/tools"
android:layout_width="match_parent"
android:layout_height="match_parent">
<ImageView
android:id="@+id/imageView"
android:layout_width="300px"
android:layout_height="300px"
android:scaleType="fitXY"
tools:ignore="MissingConstraints" />
</androidx.constraintlayout.widget.ConstraintLayout>
|
1
2
3
4
5
6
7
8
9
| package com.example.myapplication8;
public class images {
public final static int imgids[]=new int[]{
R.drawable.p1,R.drawable.p2,R.drawable.p3,R.drawable.p4,
R.drawable.p5,R.drawable.p6,R.drawable.p7
};
}
|
1
2
3
4
5
6
7
8
9
10
11
12
13
14
15
16
17
18
19
20
21
22
23
24
25
26
27
28
29
30
31
32
33
34
35
36
37
38
39
40
41
42
43
44
45
46
47
48
49
| package com.example.myapplication8;
import android.content.Context;
import android.view.LayoutInflater;
import android.view.View;
import android.view.ViewGroup;
import android.widget.ImageView;
import androidx.annotation.NonNull;
import androidx.viewpager.widget.PagerAdapter;
public class ViewPagerAdapter extends PagerAdapter {
private Context context;
private LayoutInflater layoutInflater;
private int[] datas;
public ViewPagerAdapter(Context context,int[] datas)
{
this.context=context;
this.datas=datas;
layoutInflater=LayoutInflater.from(context);
}
@Override
public int getCount() {
return datas.length;
}
@Override
public boolean isViewFromObject(@NonNull View view, @NonNull Object object) {
return view==object;
}
@Override
public void destroyItem(@NonNull ViewGroup container, int position, @NonNull Object object) {
container.removeView((View) object);
}
@NonNull
@Override
public Object instantiateItem(@NonNull ViewGroup container, int position) {
View layout=layoutInflater.inflate(R.layout.viewpager_item,null);
ImageView iv= layout.findViewById(R.id.imageView);
iv.setImageResource(datas[position]);
container.addView(layout);
return layout;
}
}
|
1
2
3
4
5
6
7
8
9
10
11
12
13
14
15
16
17
18
19
20
21
22
23
24
25
26
27
28
29
30
31
32
33
34
35
36
37
38
39
40
41
42
43
44
45
46
47
48
49
50
51
52
53
54
55
56
57
58
59
60
61
62
63
64
65
66
67
68
69
70
| package com.example.myapplication8;
import androidx.annotation.NonNull;
import androidx.appcompat.app.AppCompatActivity;
import androidx.viewpager.widget.ViewPager;
import android.os.Bundle;
import android.os.Handler;
import android.os.Message;
import android.view.View;
import android.widget.Button;
import android.widget.ImageButton;
import android.widget.ImageView;
import java.util.concurrent.Executors;
import java.util.concurrent.ScheduledExecutorService;
import java.util.concurrent.TimeUnit;
public class MainActivity extends AppCompatActivity {
private int[] imgids= com.example.myapplication8.images.imgids;
private ImageView imageView;
public Button btn;
int imgstart=0;
private ScheduledExecutorService scheduledExecutorService;
private Handler handler =new Handler()
{
@Override
public void handleMessage(@NonNull Message msg) {
switch (msg.what)
{ case 0x123:
imageView.setImageResource(imgids[imgstart++%7]);
break;
}
}
};
@Override
protected void onCreate(Bundle savedInstanceState) {
super.onCreate(savedInstanceState);
setContentView(R.layout.activity_main);
imageView=findViewById(R.id.imageView1);
}
@Override
protected void onStart() {
super.onStart();
btn = findViewById(R.id.button);
btn.setOnClickListener(new View.OnClickListener() {
@Override
public void onClick(View v) {
scheduledExecutorService = Executors.newSingleThreadScheduledExecutor();
scheduledExecutorService.scheduleAtFixedRate(new Runnable() {
@Override
public void run() {
handler.sendEmptyMessage(0x123);
}
}, 0, 100, TimeUnit.MILLISECONDS);
}
});
}
@Override
protected void onStop() {
super.onStop();
if (scheduledExecutorService != null)
{
scheduledExecutorService.shutdown();
}
}
}
|
实现过程即通过 scheduledExecutorService的scheduleAtFixedRate()来利用hander的sendEmptyMessage()方法传递what标识符,然后在handleMessage()中switch判断标识符,并修改imageView的图片。
2. 利用AsyncTast实现异步操作
(1)新建另一个安卓工程,在默认的layout主界面中添加一个按钮(Button),一个图片显示控件(ImageView)。
(2)参考课堂教授的方法,使用AsyncTast实现类似的动画效果。
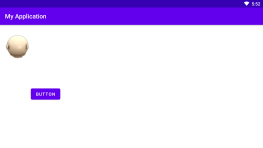
(3)测试上述功能,比较两种方法在代码构造上的优劣。
![]()
![]()
1
2
3
4
5
6
7
8
9
10
11
12
13
14
15
16
17
18
19
20
21
22
23
24
25
26
27
28
| <?xml version="1.0" encoding="utf-8"?>
<androidx.constraintlayout.widget.ConstraintLayout xmlns:android="http://schemas.android.com/apk/res/android"
xmlns:app="http://schemas.android.com/apk/res-auto"
xmlns:tools="http://schemas.android.com/tools"
android:layout_width="match_parent"
android:layout_height="match_parent"
tools:context=".MainActivity">
<Button
android:id="@+id/button"
android:layout_width="wrap_content"
android:layout_height="wrap_content"
android:layout_marginStart="100dp"
android:layout_marginLeft="100dp"
android:layout_marginTop="200dp"
android:text="Button"
app:layout_constraintStart_toStartOf="parent"
app:layout_constraintTop_toTopOf="parent" />
<ImageView
android:id="@+id/imageView1"
android:layout_width="wrap_content"
android:layout_height="wrap_content"
android:scaleType="fitXY"
tools:ignore="MissingConstraints" />
</androidx.constraintlayout.widget.ConstraintLayout>
|
1
2
3
4
5
6
7
8
9
10
11
12
13
14
15
16
17
18
19
20
21
22
23
24
25
26
27
28
29
30
31
32
33
34
35
36
37
38
39
40
41
42
43
44
45
46
47
48
49
50
51
52
53
54
55
56
57
58
59
60
61
62
63
64
65
66
67
68
69
70
71
72
73
74
75
| package com.example.myapplication;
import androidx.appcompat.app.AppCompatActivity;
import android.os.AsyncTask;
import android.os.Bundle;
import android.text.PrecomputedText;
import android.view.View;
import android.widget.Button;
import android.widget.ImageView;
public class MainActivity extends AppCompatActivity {
private int[] imgids= {
R.drawable.p1,R.drawable.p2,R.drawable.p3,R.drawable.p4,
R.drawable.p5,R.drawable.p6,R.drawable.p7
};;
private ImageView imageView;
public Button btn;
@Override
protected void onCreate(Bundle savedInstanceState) {
super.onCreate(savedInstanceState);
setContentView(R.layout.activity_main);
imageView=findViewById(R.id.imageView1);
btn=findViewById(R.id.button);
btn.setOnClickListener(new View.OnClickListener() {
@Override
public void onClick(View v) {
Task task=new Task();
task.execute();
}
});
}
class Task extends AsyncTask<Void,Integer,Boolean>
{ int imgstart;
@Override
protected void onPreExecute() {
super.onPreExecute();
}
@Override
protected Boolean doInBackground(Void... params){
try {
while(true)
{
Thread.sleep(100);
imgstart++;
imgstart=imgstart%7;
publishProgress(imgstart);
if(imgstart==8)
{
break;
}
}
} catch (InterruptedException e) {
e.printStackTrace();
}
return true;
}
@Override
protected void onProgressUpdate(Integer... values) {
super.onProgressUpdate(values);
imageView.setImageResource(imgids[values[0]]);
}
@Override
protected void onPostExecute(Boolean bollean) {
super.onPostExecute(bollean);
}
}
}
|
四: 实验总结:
在本实验中,我对多线程与异步操作的实现有了基本了解,并知道了2种线程的实现方法,即利用handle与 scheduledExecutorService和继承AsyncTask的方法,我认为这两种方法都比较好用,但AsyncTask虽然结构比较清晰,但要注意参数配置,还必须在onProgressUpdate()中才能对Android的UI进行更新,容易出错,而handle利用时虽然代码比较复杂,但实验实现时不易出错。