Android UI控件的使用 一、实验目的 1.掌握Android基本布局的使用方法;
二、实验要求 1.掌握线性布局(Linearlayout)和相对布局(Relativelayout)的使用方法;
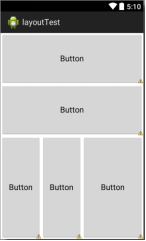
三、实验内容 1. 掌握线性布局(linearlayout)和相对布局(relativelayout)的使用方法 (1)新建一个安卓工程,在默认的layout界面中设置布局为线性布局水平,在布局中添加5个按钮控件和一个线性布局垂直控件,其布局如下图所示:
1
2
3
4
5
6
7
8
9
10
11
12
13
14
15
16
17
18
19
20
21
22
23
24
25
26
27
28
29
30
31
32
33
34
35
36
37
38
39
40
41
42
43
44
45
46
47
48
49
50
51
52
53
54
55
56
57
58
59
60
61
62
63
64
65
66
67
<?xml version="1.0" encoding="utf-8" ?> <androidx.constraintlayout.widget.ConstraintLayout xmlns:android="http://schemas.android.com/apk/res/android" xmlns:app="http://schemas.android.com/apk/res-auto" xmlns:tools="http://schemas.android.com/tools" android:layout_width="match_parent" android:layout_height="match_parent" android:showDividers="middle" android:dividerPadding="10dp" tools:context=".MainActivity" > <?xml version="1.0" encoding="utf-8" ?> <LinearLayout android:orientation="vertical" android:layout_width="match_parent" android:layout_height="match_parent" > <Button android:layout_width="fill_parent" android:layout_height="0dp" android:layout_weight="1" android:text="Button" app:backgroundTint="#757171" /> <Button android:layout_width="fill_parent" android:layout_height="0dp" android:layout_weight="1" android:text="Button" app:backgroundTint="#757171" /> <LinearLayout android:layout_width="match_parent" android:layout_height="0dp" android:layout_weight="2" android:orientation="horizontal" > <Button android:layout_width="0dp" android:layout_height="match_parent" android:layout_weight="2" android:text="Button" app:backgroundTint="#757171" /> <Button android:layout_width="0dp" android:layout_height="fill_parent" android:layout_weight="2" android:text="Button" app:backgroundTint="#757171" /> <Button android:layout_width="0dp" android:layout_height="fill_parent" android:layout_weight="3" android:text="Button" app:backgroundTint="#757171" /> </LinearLayout> </LinearLayout> </androidx.constraintlayout.widget.ConstraintLayout>
(2)其中水平线性布局中的两个按钮和垂直线性布局的高度比例为:1:1:2,垂直线性布局内三个按钮的宽度比例为:2:2:3。
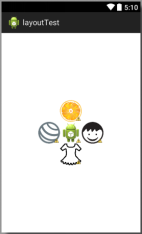
1
2
3
4
5
6
7
8
9
10
11
12
13
14
15
16
17
18
19
20
21
22
23
24
25
26
27
28
29
30
31
32
33
34
35
36
37
38
39
40
41
42
43
44
45
46
47
48
49
50
51
52
53
54
55
56
57
58
59
60
61
62
63
64
65
66
67
68
69
70
71
72
73
74
75
76
77
78
<?xml version="1.0" encoding="utf-8" ?> <androidx.constraintlayout.widget.ConstraintLayout xmlns:android="http://schemas.android.com/apk/res/android" xmlns:app="http://schemas.android.com/apk/res-auto" xmlns:tools="http://schemas.android.com/tools" android:layout_width="match_parent" android:layout_height="match_parent" tools:context=".MainActivity2" > <ImageView android:id="@+id/imageView" android:layout_width="0dp" android:layout_height="100dp" android:layout_marginTop="100dp" android:layout_marginEnd="56dp" android:layout_marginRight="56dp" android:layout_marginBottom="100dp" app:layout_constraintBottom_toBottomOf="@+id/imageView3" app:layout_constraintEnd_toEndOf="parent" app:layout_constraintStart_toEndOf="@+id/imageView7" app:layout_constraintTop_toTopOf="@+id/imageView2" app:srcCompat="@drawable/child" /> <ImageView android:id="@+id/imageView2" android:layout_width="100dp" android:layout_height="0dp" android:layout_marginStart="100dp" android:layout_marginLeft="100dp" android:layout_marginTop="187dp" android:layout_marginEnd="100dp" android:layout_marginRight="100dp" app:layout_constraintBottom_toTopOf="@+id/imageView7" app:layout_constraintEnd_toEndOf="@+id/imageView" app:layout_constraintStart_toStartOf="@+id/imageView4" app:layout_constraintTop_toTopOf="parent" app:srcCompat="@drawable/arancia_fruit" /> <ImageView android:id="@+id/imageView3" android:layout_width="100dp" android:layout_height="0dp" android:layout_marginStart="100dp" android:layout_marginLeft="100dp" android:layout_marginEnd="100dp" android:layout_marginRight="100dp" android:layout_marginBottom="244dp" app:layout_constraintBottom_toBottomOf="parent" app:layout_constraintEnd_toEndOf="@+id/imageView" app:layout_constraintStart_toStartOf="@+id/imageView4" app:layout_constraintTop_toBottomOf="@+id/imageView7" app:srcCompat="@drawable/dress2" /> <ImageView android:id="@+id/imageView4" android:layout_width="0dp" android:layout_height="100dp" android:layout_marginStart="55dp" android:layout_marginLeft="55dp" android:layout_marginTop="100dp" android:layout_marginBottom="100dp" app:layout_constraintBottom_toBottomOf="@+id/imageView3" app:layout_constraintEnd_toStartOf="@+id/imageView7" app:layout_constraintStart_toStartOf="parent" app:layout_constraintTop_toTopOf="@+id/imageView2" app:srcCompat="@drawable/fitness_ball" /> <ImageView android:id="@+id/imageView7" android:layout_width="0dp" android:layout_height="0dp" android:layout_centerInParent="true" app:layout_constraintBottom_toTopOf="@+id/imageView3" app:layout_constraintEnd_toStartOf="@+id/imageView" app:layout_constraintStart_toEndOf="@+id/imageView4" app:layout_constraintTop_toBottomOf="@+id/imageView2" app:srcCompat="@android:mipmap/sym_def_app_icon" /> </androidx.constraintlayout.widget.ConstraintLayout>
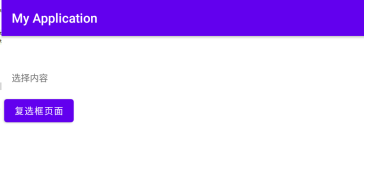
2. 掌握文本框(TextView)、按钮(Button)、EditText(可编辑文本)和CheckBox(复选框)控件的使用方法 (1)新建一个安卓工程,在默认的layout界面中分别添加一个文本框(TextView)、按钮(Button)和EditText(可编辑文本)控件。
1
2
3
4
5
6
7
8
9
10
11
12
13
14
15
16
17
18
19
20
21
22
23
24
25
26
27
28
29
30
31
<?xml version="1.0" encoding="utf-8" ?> <androidx.constraintlayout.widget.ConstraintLayout xmlns:android="http://schemas.android.com/apk/res/android" xmlns:app="http://schemas.android.com/apk/res-auto" xmlns:tools="http://schemas.android.com/tools" android:layout_width="match_parent" android:layout_height="match_parent" tools:context=".MainActivity" > <TextView android:id="@+id/textView2" android:layout_width="wrap_content" android:layout_height="wrap_content" android:layout_marginStart="16dp" android:layout_marginLeft="16dp" android:layout_marginBottom="18dp" android:text="选择内容" app:layout_constraintBottom_toTopOf="@+id/button" app:layout_constraintStart_toStartOf="parent" /> <Button android:id="@+id/button" android:layout_width="wrap_content" android:layout_height="wrap_content" android:layout_marginStart="4dp" android:layout_marginLeft="4dp" android:layout_marginTop="93dp" android:text="复选框页面" app:layout_constraintStart_toStartOf="parent" app:layout_constraintTop_toTopOf="parent" /> </androidx.constraintlayout.widget.ConstraintLayout>
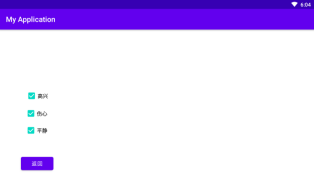
1
2
3
4
5
6
7
8
9
10
11
12
13
14
15
16
17
18
19
20
21
22
23
24
25
26
27
28
29
30
31
32
33
34
35
36
37
38
39
40
41
42
43
44
45
46
47
48
49
50
51
<?xml version="1.0" encoding="utf-8" ?> <androidx.constraintlayout.widget.ConstraintLayout xmlns:android="http://schemas.android.com/apk/res/android" xmlns:app="http://schemas.android.com/apk/res-auto" xmlns:tools="http://schemas.android.com/tools" android:layout_width="match_parent" android:layout_height="match_parent" tools:context=".MainActivity2" > <Button android:id="@+id/but" android:layout_width="wrap_content" android:layout_height="wrap_content" android:layout_marginStart="57dp" android:layout_marginLeft="57dp" android:layout_marginTop="42dp" android:text="返回" app:layout_constraintStart_toStartOf="parent" app:layout_constraintTop_toBottomOf="@+id/checkBox3" /> <CheckBox android:id="@+id/checkBox1" android:layout_width="wrap_content" android:layout_height="wrap_content" android:layout_marginStart="2dp" android:layout_marginLeft="2dp" android:text="高兴" app:layout_constraintBottom_toTopOf="@+id/checkBox2" app:layout_constraintStart_toStartOf="@+id/checkBox2" /> <CheckBox android:id="@+id/checkBox2" android:layout_width="wrap_content" android:layout_height="wrap_content" android:layout_marginStart="68dp" android:layout_marginLeft="68dp" android:layout_marginTop="205dp" android:text="伤心" app:layout_constraintStart_toStartOf="parent" app:layout_constraintTop_toTopOf="parent" /> <CheckBox android:id="@+id/checkBox3" android:layout_width="wrap_content" android:layout_height="wrap_content" android:layout_marginTop="46dp" android:text="平静" app:layout_constraintStart_toStartOf="@+id/checkBox2" app:layout_constraintTop_toTopOf="@+id/checkBox2" /> </androidx.constraintlayout.widget.ConstraintLayout>
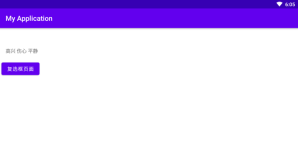
1
2
3
4
5
6
7
8
9
10
11
12
13
14
15
16
17
18
19
20
21
22
23
24
25
26
27
28
29
30
31
32
33
34
35
36
37
38
39
40
41
42
43
package com.example.myapplication;import androidx.annotation.Nullable;import androidx.appcompat.app.AppCompatActivity;import android.content.Intent;import android.os.Bundle;import android.view.View;import android.widget.Button;import android.widget.EditText;import android.widget.TextView;public class MainActivity extends AppCompatActivity { @Override public void onCreate (Bundle savedInstanceState) { super .onCreate(savedInstanceState); setContentView(R.layout.activity_main); Button button = (Button) findViewById(R.id.button); button.setOnClickListener(new View .OnClickListener() { @Override public void onClick (View v) { Intent intent = new Intent (MainActivity.this ,MainActivity2.class); startActivityForResult(intent,0x11 ); } }); } @Override protected void onActivityResult (int requestCode, int resultCode, @Nullable Intent data) { super .onActivityResult(requestCode, resultCode, data); TextView textView=(TextView) findViewById(R.id.textView2); if (requestCode==0x11 && resultCode==0x11 ){ Bundle bundle = data.getExtras(); String string= bundle.getString("check" ); textView.setText(string); } } }
1
2
3
4
5
6
7
8
9
10
11
12
13
14
15
16
17
18
19
20
21
22
23
24
25
26
27
28
29
30
31
32
33
34
35
36
37
38
39
40
41
42
43
44
45
46
47
48
49
50
51
52
53
54
55
56
57
58
59
60
61
62
63
package com.example.myapplication;import androidx.appcompat.app.AppCompatActivity;import android.content.Intent;import android.os.Bundle;import android.view.View;import android.widget.Button;import android.widget.CheckBox;import android.widget.EditText;import android.widget.TextView;import android.widget.Toast;import java.util.ArrayList;import java.util.List;public class MainActivity2 extends AppCompatActivity { @Override protected void onCreate (Bundle savedInstanceState) { super .onCreate(savedInstanceState); setContentView(R.layout.activity_main2); Button button = (Button) findViewById(R.id.but); CheckBox checkBox1, checkBox2, checkBox3; List<CheckBox> checkBoxList = new ArrayList <CheckBox>(); checkBox1 = (CheckBox) findViewById(R.id.checkBox1); checkBox2 = (CheckBox) findViewById(R.id.checkBox2); checkBox3 = (CheckBox) findViewById(R.id.checkBox3); checkBoxList.add(checkBox1); checkBoxList.add(checkBox2); checkBoxList.add(checkBox3); button.setOnClickListener(new View .OnClickListener() { @Override public void onClick (View v) { Intent intent = getIntent(); Bundle bundle = new Bundle (); StringBuffer sb = new StringBuffer (); for (CheckBox checkbox : checkBoxList) { if (checkbox.isChecked()){ sb.append(checkbox.getText().toString() + " " ); } } String s = sb.toString(); if (sb!=null && "" .equals(sb.toString())){ Toast.makeText(getApplicationContext(), "请至少选择一个" , Toast.LENGTH_SHORT).show(); }else { Toast.makeText(getApplicationContext(), sb.toString(), Toast.LENGTH_SHORT).show(); } bundle.putCharSequence("check" ,s); intent.putExtras(bundle); setResult(0x11 ,intent); finish(); } }); } }
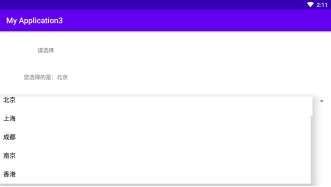
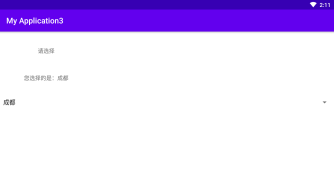
3. 掌握下拉列表(Spinner)控件的使用方法 (1)ArrayAdapter可称为数组适配器,是Spinner和ListView中最简单的一种适配器,它将一个数组和列表控件之间建立连接,可以将数组里定义的内容一一对应的显示在列表中。
(4)使用下列代码实现下拉列表功能。程序初始化时,为下拉列表定义一个适配器ArrayAdapter,为下拉列表赋值,列表选项从citys中获取。下拉列表从适配器中读取值,调用下拉列表赋值、响应函数。
1
2
3
4
5
6
7
8
9
10
11
12
13
14
15
16
17
18
19
20
21
22
23
24
25
26
27
28
29
30
31
32
33
34
35
36
37
38
39
<?xml version="1.0" encoding="utf-8" ?> <androidx.constraintlayout.widget.ConstraintLayout xmlns:android="http://schemas.android.com/apk/res/android" xmlns:app="http://schemas.android.com/apk/res-auto" xmlns:tools="http://schemas.android.com/tools" android:layout_width="match_parent" android:layout_height="match_parent" tools:context=".MainActivity" > <TextView android:id="@+id/textView" android:layout_width="wrap_content" android:layout_height="wrap_content" android:layout_marginTop="39dp" android:text="TextView" app:layout_constraintEnd_toEndOf="@+id/textView2" app:layout_constraintStart_toStartOf="@+id/textView2" app:layout_constraintTop_toTopOf="parent" /> <TextView android:id="@+id/textView2" android:layout_width="wrap_content" android:layout_height="wrap_content" android:layout_marginStart="61dp" android:layout_marginLeft="61dp" android:layout_marginBottom="40dp" android:text="TextView" app:layout_constraintBottom_toTopOf="@+id/spinner" app:layout_constraintStart_toStartOf="parent" /> <Spinner android:id="@+id/spinner" android:layout_width="0dp" android:layout_height="wrap_content" android:layout_marginTop="168dp" app:layout_constraintEnd_toEndOf="parent" app:layout_constraintStart_toStartOf="parent" app:layout_constraintTop_toTopOf="parent" /> </androidx.constraintlayout.widget.ConstraintLayout>
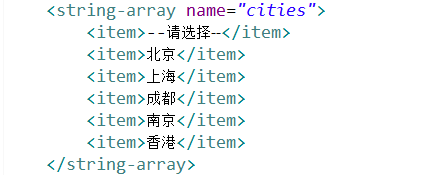
1
2
3
4
5
6
7
8
9
10
11
<resources> <string name="app_name" >My Application3</string> <string-array name="cities" > <item>--请选择--</item> <item>北京</item> <item>上海</item> <item>成都</item> <item>南京</item> <item>香港</item> </string-array> </resources>
1
2
3
4
5
6
7
8
9
10
11
12
13
14
15
16
17
18
19
20
21
22
23
24
25
26
27
28
29
30
31
32
33
34
35
36
37
38
39
40
41
42
43
44
45
46
47
48
49
50
51
52
53
54
55
56
package com.example.myapplication3;import androidx.appcompat.app.AppCompatActivity;import android.os.Bundle;import android.view.View;import android.widget.AdapterView;import android.widget.ArrayAdapter;import android.widget.Spinner;import android.widget.TextView;public class MainActivity extends AppCompatActivity { TextView tv1; TextView tv2; Spinner sp; View.OnClickListener ocl = null ; ArrayAdapter<CharSequence> adapter; @Override public void onCreate (Bundle savedInstanceState) { super .onCreate(savedInstanceState); setContentView(R.layout.activity_main); tv1 = (TextView)findViewById(R.id.textView); tv2 = (TextView)findViewById(R.id.textView2); sp = (Spinner)findViewById(R.id.spinner); tv1.setText("请选择" ); sp.setPrompt("选择项" ); spinner_set(); } private void spinner_set () { adapter = ArrayAdapter.createFromResource(this , R.array.cities, android.R.layout.simple_spinner_item); adapter.setDropDownViewResource(android.R.layout.simple_spinner_dropdown_item); sp.setAdapter(adapter); sp.setOnItemSelectedListener(new AdapterView .OnItemSelectedListener() { public void onItemSelected (AdapterView<?> arg0, View arg1, int arg2, long arg3) { if (arg2 != 0 ){ tv2.setText("您选择的是:" + adapter.getItem(arg2)); } else { tv2.setText("您还没有选择!" ); } } public void onNothingSelected (AdapterView<?> arg0) { tv2.setText("您还没有选择!" ); } }); } }
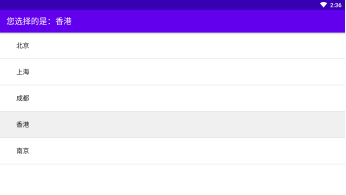
4.掌握列表(ListView)控件的使用方法 (1)ListView控件也通过ArrayAdapter建立与数据的连接,可以将数组里定义的内容一一对应的显示在ListView中,每一项一般只有一个TextView,即一行只能显示一个数组Item调用toString()方法生成的一行字符串。
1
2
3
4
5
6
7
8
9
10
11
12
13
14
15
16
17
18
<?xml version="1.0" encoding="utf-8" ?> <androidx.constraintlayout.widget.ConstraintLayout xmlns:android="http://schemas.android.com/apk/res/android" xmlns:app="http://schemas.android.com/apk/res-auto" xmlns:tools="http://schemas.android.com/tools" android:layout_width="match_parent" android:layout_height="match_parent" tools:context=".MainActivity" > <TextView android:layout_width="wrap_content" android:layout_height="wrap_content" android:text="Hello World!" app:layout_constraintBottom_toBottomOf="parent" app:layout_constraintLeft_toLeftOf="parent" app:layout_constraintRight_toRightOf="parent" app:layout_constraintTop_toTopOf="parent" /> </androidx.constraintlayout.widget.ConstraintLayout>
1
2
3
4
5
6
7
8
9
10
11
12
13
14
15
16
17
18
19
20
21
22
23
24
25
26
27
28
29
30
31
32
33
34
35
36
37
38
39
40
41
42
43
44
45
46
package com.example.myapplication4;import androidx.appcompat.app.AppCompatActivity;import android.os.Bundle;import android.view.View;import android.widget.AdapterView;import android.widget.ArrayAdapter;import android.widget.ListView;import java.util.ArrayList;import java.util.List;public class MainActivity extends AppCompatActivity { public void onCreate (Bundle savedInstanceState) { super .onCreate(savedInstanceState); setContentView(R.layout.activity_main); ListView lv = new ListView (this ); lv.setAdapter(new ArrayAdapter <String>(this , android.R.layout.simple_expandable_list_item_1,getData())); setContentView(lv); lv.setOnItemClickListener(new AdapterView .OnItemClickListener(){ public void onItemClick (AdapterView<?> arg0, View arg1, int arg2, long arg3) { setTitle("您点击的是:" + arg0.getItemAtPosition(arg2).toString()); } }); lv.setOnItemSelectedListener(new AdapterView .OnItemSelectedListener(){ public void onItemSelected (AdapterView<?> arg0, View arg1, int arg2, long arg3) { setTitle("您选择的是:" + arg0.getItemAtPosition(arg2).toString()); } public void onNothingSelected (AdapterView<?> arg0) { } }); } List<String> getData () { List<String> l = new ArrayList <String>(); l.add("北京" ); l.add("上海" ); l.add("成都" ); l.add("香港" ); l.add("南京" ); return l; } }
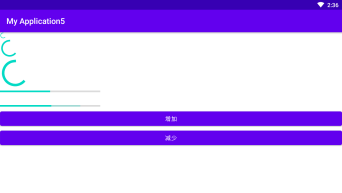
5.掌握进度条(ProgressBar)控件的使用方法 (1)进度条可以为用户呈现操作的进度。一般进度条的长度用来显示进度信息,工作完成量的百分比,同时还可以加入次要进度条显示次要进度信息,比如用主要进度条显示流媒体的播放进度,用次要进度条显示缓冲进度。一个进度条也可不确定其进度。在不确定模式下,进度条显示循环动画。这种模式常用于应用程序使用任务的长度是未知的。
1
2
3
4
5
6
7
8
9
10
11
12
13
14
15
16
17
18
19
20
21
22
23
24
25
26
27
28
29
30
31
32
33
34
35
36
37
38
39
40
41
42
43
44
45
46
47
48
49
50
51
52
53
54
55
56
57
58
59
60
61
62
63
<?xml version="1.0" encoding="utf-8" ?> <androidx.constraintlayout.widget.ConstraintLayout xmlns:android="http://schemas.android.com/apk/res/android" xmlns:app="http://schemas.android.com/apk/res-auto" xmlns:tools="http://schemas.android.com/tools" android:layout_width="match_parent" android:layout_height="match_parent" tools:context=".MainActivity" > <LinearLayout android:layout_width="match_parent" android:layout_height="match_parent" android:orientation="vertical" tools:layout_editor_absoluteX="192dp" tools:layout_editor_absoluteY="308dp" > <ProgressBar android:id="@+id/progressBar1" style="?android:attr/progressBarStyleSmallTitle" android:layout_width="wrap_content" android:layout_height="wrap_content" /> <ProgressBar android:id="@+id/progressBar2" android:layout_width="wrap_content" android:layout_height="wrap_content" /> <ProgressBar android:id="@+id/progressBar3" style="?android:attr/progressBarStyleLarge" android:layout_width="wrap_content" android:layout_height="wrap_content" /> <ProgressBar android:id="@+id/progressBar4" style="?android:attr/progressBarStyleHorizontal" android:layout_width="250dip" android:layout_height="wrap_content" android:max="100" android:progress="50" /> <ProgressBar android:id="@+id/progressBar5" style="?android:attr/progressBarStyleHorizontal" android:layout_width="250dip" android:layout_height="wrap_content" android:max="100" android:progress="50" android:secondaryProgress="80" android:layout_marginTop="20dp" /> <Button android:id="@+id/button" android:layout_width="match_parent" android:layout_height="wrap_content" android:text="增加" /> <Button android:id="@+id/button2" android:layout_width="match_parent" android:layout_height="wrap_content" android:text="减少" /> </LinearLayout> </androidx.constraintlayout.widget.ConstraintLayout>
1
2
3
4
5
6
7
8
9
10
11
12
13
14
15
16
17
18
19
20
21
22
23
24
25
26
27
28
29
30
31
32
33
34
35
36
37
38
39
40
41
42
43
package com.example.myapplication5;import androidx.appcompat.app.AppCompatActivity;import android.os.Bundle;import android.view.View;import android.view.Window;import android.widget.Button;import android.widget.ProgressBar;public class MainActivity extends AppCompatActivity { ProgressBar pb1,pb2,pb3,pb4,pb5; View.OnClickListener ocl1 = null ; View.OnClickListener ocl2 = null ; Button bt1; Button bt2; @Override public void onCreate (Bundle savedInstanceState) { super .onCreate(savedInstanceState); this .requestWindowFeature(Window.FEATURE_INDETERMINATE_PROGRESS); setContentView(R.layout.activity_main); setProgressBarIndeterminateVisibility(true ); pb5 = (ProgressBar)findViewById(R.id.progressBar5); bt1 = (Button)findViewById(R.id.button); bt2 = (Button)findViewById(R.id.button2); ocl1 = new View .OnClickListener(){ public void onClick (View v) { pb5.setProgress((int )(pb5.getProgress()*1.2 )); } }; ocl2 = new View .OnClickListener(){ public void onClick (View v) { pb5.setProgress((int )(pb5.getProgress()*0.8 )); } }; bt1.setOnClickListener(ocl1); bt2.setOnClickListener(ocl2); } }
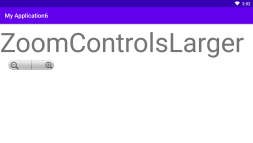
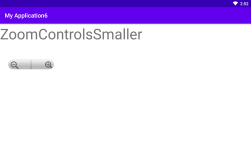
(1)ZoomControls是一个包含放大、缩小按钮的控件。而ZoomButton是您自己定义的缩放按钮,它允许你定义多个这样的按钮,它显示的只能是图片,没有Text属性。
1
2
3
4
5
6
7
8
9
10
11
12
13
14
15
16
17
18
19
20
21
22
23
24
25
26
27
28
29
<?xml version="1.0" encoding="utf-8" ?> <androidx.constraintlayout.widget.ConstraintLayout xmlns:android="http://schemas.android.com/apk/res/android" xmlns:app="http://schemas.android.com/apk/res-auto" xmlns:tools="http://schemas.android.com/tools" android:layout_width="match_parent" android:layout_height="match_parent" tools:context=".MainActivity" > <LinearLayout android:layout_width="match_parent" android:layout_height="match_parent" android:orientation="vertical" tools:layout_editor_absoluteX="163dp" tools:layout_editor_absoluteY="306dp" > <TextView android:id="@+id/textView" android:layout_width="979dp" android:layout_height="207dp" android:text="我是放大了还是缩小了" /> <ZoomControls android:id="@+id/myZoomController" android:layout_width="211dp" android:layout_height="99dp" android:gravity="center_horizontal" /> </LinearLayout> </androidx.constraintlayout.widget.ConstraintLayout>
1
2
3
4
5
6
7
8
9
10
11
12
13
14
15
16
17
18
19
20
21
22
23
24
25
26
27
28
29
30
31
32
33
34
35
36
package com.example.myapplication6;import androidx.appcompat.app.AppCompatActivity;import android.os.Bundle;import android.view.View;import android.widget.TextView;import android.widget.ZoomControls;public class MainActivity extends AppCompatActivity { TextView tv1; static float size1 = 20 ; @Override public void onCreate (Bundle savedInstanceState) { super .onCreate(savedInstanceState); setContentView(R.layout.activity_main); tv1 = (TextView)findViewById(R.id.textView); ZoomControls zc = (ZoomControls)findViewById(R.id.myZoomController); zc.setOnZoomInClickListener(new View .OnClickListener(){ public void onClick (View v) { size1 += 10 ; tv1.setText("ZoomControlsLarger" ); tv1.setTextSize(size1); } }); zc.setOnZoomOutClickListener(new View .OnClickListener(){ public void onClick (View v) { size1 -= 10 ; tv1.setText("ZoomControlsSmaller" ); tv1.setTextSize(size1); } }); } }